Data Management
This page is intended to document all aspects of data management, from the day-to-day, formal NGS and proteomics plans, and general archiving options. Inspiration for this has been provided by Tim Essington and Gordon Holtgrieve who have developed similar documentation.
Data must be:
-
Adequately described via metadata.
-
Managed for data quality.
-
Backed up in a secure manner.
-
Archived in an easily reproducible format.
File and Directory Organization
Good file organization is a core lab skill. Phones and tablets often hide the directory structure from users, but on a computer every file has a specific location, also called a path. Knowing where files are stored is essential for reproducible research, collaboration, data safety, and long-term project continuity.
A file is not just "in Word", "in RStudio", or "on the computer." It lives in a specific directory. For example:
/Users/name/GitHub/project-name/data/raw/sample_metadata.csv
Lab members should be able to identify where important files and directories are located. This helps prevent lost work, accidental editing of the wrong copy, broken code paths, and duplicate versions scattered across Desktop, Downloads, cloud folders, email attachments, and external drives.
Before starting or moving work, ask:
- Where is this file or project located?
- Is this the original file or a copy?
- Is this file part of a project directory?
- Is this file backed up, archived, or version controlled?
- Will code, notebooks, collaborators, or future lab members depend on this path?
Research projects usually include raw data, processed data, scripts, notebooks, figures, results, manuscripts, and notes. These files should be organized in a way that someone else in the lab can understand. A common project layout is:
project-name/
├── README.md
├── data/
│   ├── raw/
│   └── processed/
├── scripts/
├── notebooks/
├── results/
├── figures/
├── docs/
└── manuscript/
General principles:
- Keep raw data separate from processed data.
- Do not overwrite raw data.
- Keep scripts, notebooks, figures, and results in predictable locations.
- Include a
README.mdin each major directory describing its contents. - Use relative paths in scripts when possible so projects can be run on other computers.
- Avoid storing active research files only in
DesktoporDownloads.
GitHub Repositories
GitHub repositories require extra care because they are connected to version control. Once a repository is cloned to your computer, do not casually move it, rename it, or place it inside another folder without understanding the consequences. Moving a repository can break scripts, project settings, relative paths, Git configuration, and collaboration workflows.
GitHub repositories should generally live in a dedicated local directory, such as:
~/GitHub/
For example:
~/GitHub/project-name/
~/GitHub/lab-notebook/
~/GitHub/genomics-analysis/
Do not place GitHub repositories inside folders that automatically sync with services such as iCloud Drive, Dropbox, Google Drive, or OneDrive. Sync services can interfere with Git by modifying hidden files, creating conflicted copies, delaying updates, or corrupting repository state. A GitHub repository is already managed through Git and GitHub; it should not also be managed by a separate file-sync system.
Avoid locations such as:
~/Desktop/project-name/
~/Downloads/project-name/
~/Library/Mobile Documents/com~apple~CloudDocs/project-name/
~/Dropbox/project-name/
~/Google Drive/project-name/
~/OneDrive/project-name/
Preferred:
~/GitHub/project-name/
If a repository needs to be moved, ask for help first.
File and Directory Naming
Use file and folder names that are readable, descriptive, and computer-friendly. Good names make files easier to search, sort, use in code, and share across systems.
Recommended practices:
- Use lowercase letters where possible.
- Use hyphens
-or underscores_instead of spaces. - Use descriptive names.
- Include dates when version or chronology matters.
- Use dates in
YYYY-MM-DDformat. - Avoid special characters such as
#,%,&,?,:,*,/, and parentheses when possible. - Do not rely on vague names such as
final,new,updated, orstuff.
Good examples:
2026-06-23-sample-metadata.csv
oyster-growth-analysis.R
temperature-qc-plot.png
dna-extraction-notes.md
project-readme.md
Poor examples:
Data final FINAL.csv
new stuff.xlsx
analysis copy 2.R
Steven's file?.csv
figure#1.png
For dates, prefer:
2026-06-23-field-notes.md
rather than:
6-23-26 notes.docx
The YYYY-MM-DD format sorts correctly and avoids confusion between month/day/year and day/month/year formats.
Files named final, final2, really-final, or final-FINAL are a sign that version control or organization has broken down. For code and text-based documents, use Git whenever possible. For files that are not well suited to Git, use clear dates or version numbers.
Better:
2026-06-23-manuscript-draft.docx
2026-07-10-manuscript-draft.docx
or:
manuscript-v01.docx
manuscript-v02.docx
Good file organization is part of doing good science. A few extra seconds spent organizing files at the start can prevent hours or days of confusion later.
Metadata
All research data must be accompanied with a thorough description of that data from the beginning of the work. Metadata describes information about a dataset, such that a dataset can be understood, reused, and integrated with other datasets. Information described in a metadata record includes where the data were collected, who is responsible for the dataset, why the dataset was created, and how the data are organized.
Data Quality Standards
Students must take care that protocols and methods are employed to ensure that data are properly collected, handled, processed, used, and maintained, and that this process is documented in the metadata.
Backup and Storage
Primary should be stored in several locations with canonical versions on Gannet (see below).
Data, including intermediate analysis, needs to have a url. This most often means it will live on a Network Attached Storage Device (NAS; aka a server).
Gannet
Gannet is a Synology RS3618xs NAS :
- RS3618xs uses 16TB HDDs (n = 36)
Data on Gannet is backed up in the following ways:
-
Synology Hybrid RAID
- Mirrors data across HDDs, which reduces total storage capacity by 50%
- Allows for up to two concurrent HDD failures before data loss occurs
Gannet Data Structure
-
Each user has a dedicated, publicly accessible folder on Gannet. This is where you will store your data.
-
Gannet has two storage volumes:
-
Volume 2 (
/volume2/web/) Main storage volume. This is where you will store your data. - Volume 1 (
/volume2/web/v1_web -> /volume1/v1_web/): Symlinked to the main storage volume.
Daily Data on Gannet
Using the Gannet NAS to store your data (web interface):
- Ask Steven or Sam to generate a user account for you. A folder will be created for you in:
gannet/web/Ask Steven/Sam for the name of the folder, as well as your username and password. - Upload data to your Gannet web folder:
- Navigate to http://gannet.fish.washington.edu/
- Click on
Web Browser login.- If it's your first time visiting this page, your browser will present you with a warning about an insecure site or bad certificate. That's OK. Click on the option to add an exception for this site.
- Enter username and password. (NOTE: If it's your first time accessing your account, please change your password by clicking on the silhouette in the upper right corner, then "Personal" in the dropdown menu).
- Navigate to File Station > web > your_folder (If you don't see the File Station icon, click on the icon of four squares in the upper left corner and select File Station from the subsequent menu).
- Click-and-drag files from your computer to your
gannet/webfolder.
Using the Gannet NAS to store your data (command line): 1. Open a terminal window. 2. Use the following command to connect to Gannet:
ssh <username>@gannet.fish.washington.edu
cd /volume2/web/<your_folder>
rsync -avP <local_file> <username>@gannet.fish.washington.edu:/volume2/web/<your_folder>
Files that you have uploaded to your_folder are publicly viewable: http://gannet.fish.washington.edu/your_folder
You can use the URLs for your files for linking in your notebook.
IMPORTANT!
All folders need to contain a readme file.
The readme files should be plain text (i.e. do not create/edit the file with a word processor like Microsoft Word or LibreOffice Writer) and should describe the contents of the folder. If there are directories in the same folder as your readme file, the directory names should be listed and a brief description of their contents should be provided.
Please use computer-friendly file and folder names: lowercase letters where possible, hyphens or underscores instead of spaces, and no special characters unless needed by a documented workflow.
NGS Data Management Plan
Raw Data
-
As sequencing facility provides data, files are downloaded to our local NAS (owl), in the correct species subdirectory within
nightingales. http://owl.fish.washington.edu/nightingales/ -
MD5 checksums are generated and compared to those supplied by the sequencing facility.
- Append the generated MD5 checksums to the
checksums.md5file. If that file does not yet exist, create it, and add the generated checksums to the newchecksums.md5file.
- Append the generated MD5 checksums to the
-
The Nightingales Google Spreadsheet is updated.
- Each library (i.e. each sample with a unique sequencing barcode) is entered in its own row.
SeqIDis the base name of the sequencing file (i.e. no file extensions like ".fq.gz" or ".gz")- Each library receives a unique, incremented
Library_IDnumber. - Each library receives a
Library_name; this may or may not be unique. SeqSubmissionDateandSeqReceiptDateshould be entered in yyyymmdd format.
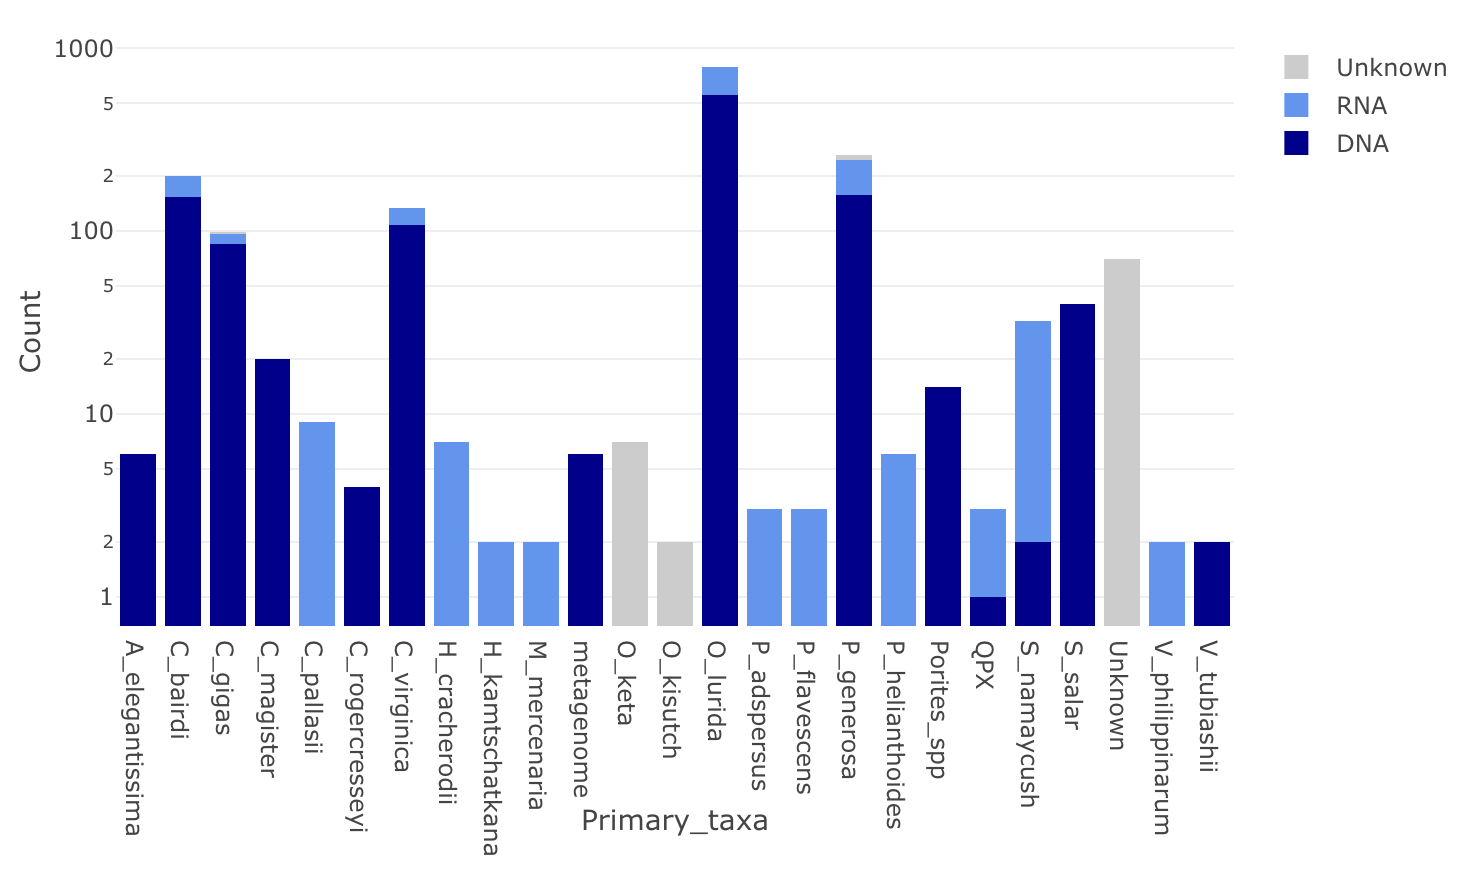
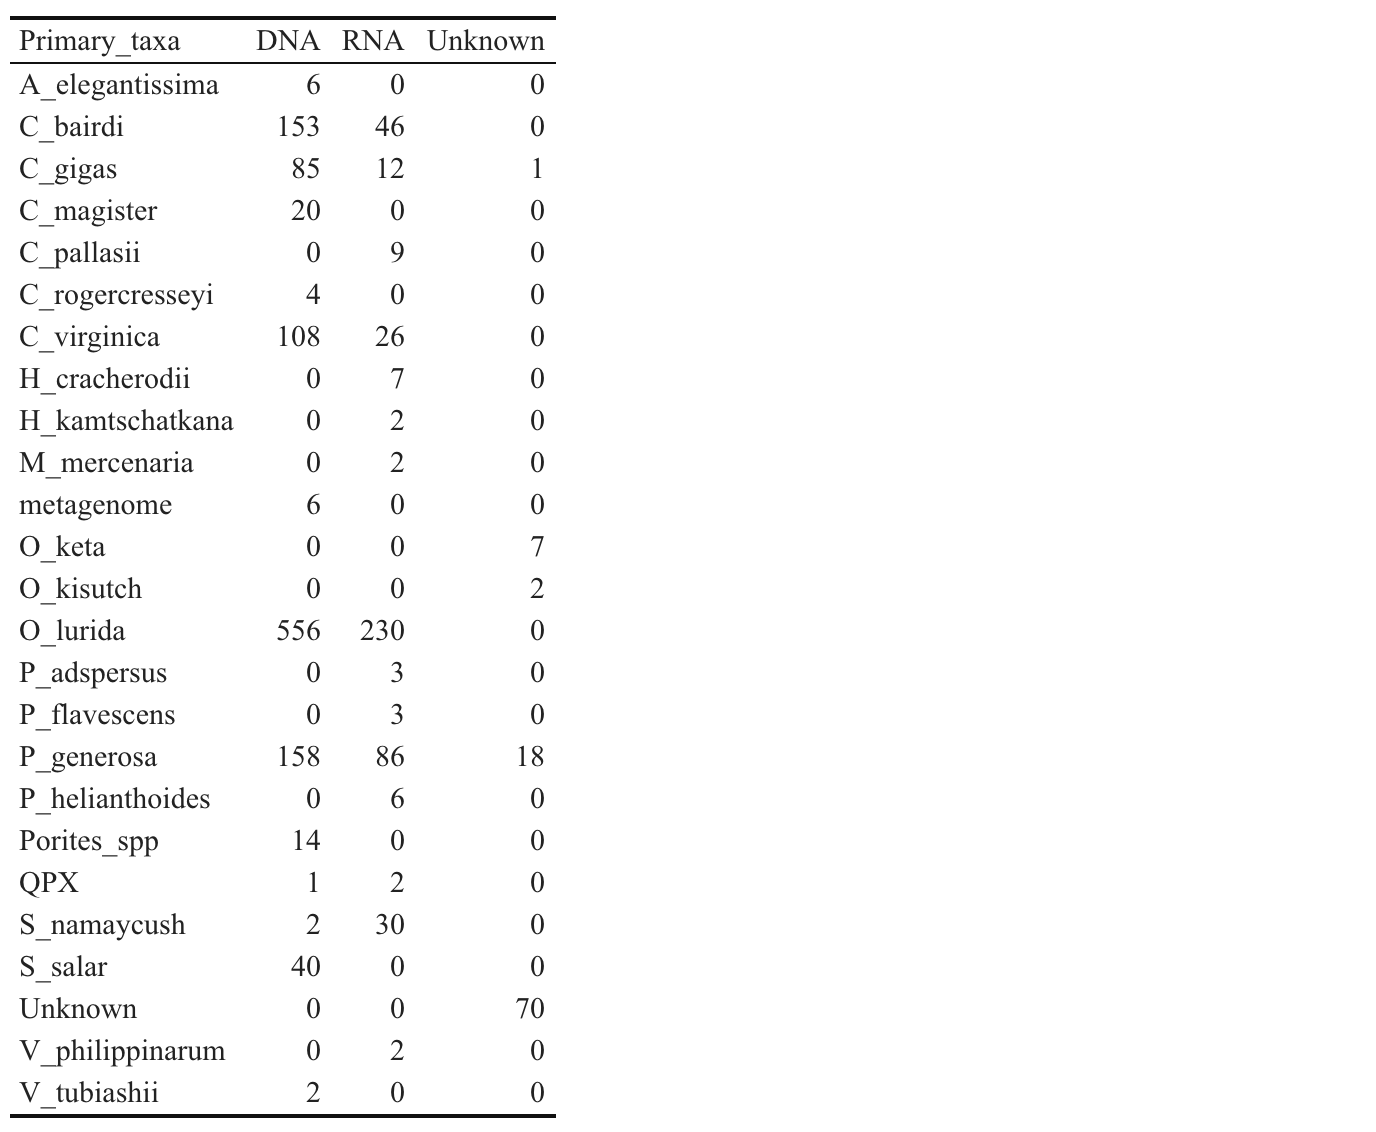
Taxa Representation in Nightingales
Backup
-
The Google Docs spreadsheet Nightingales Google Spreadsheet is backed up on a regular basis by downloading tab-delimited file and pushing to LabDocs Repository, with the file name
Nightingales.tsv -
owl/nightingalesis automatically backed up to two locations, both managed by Synology apps: -
Amazon Glacier: Backup task occurs weekly on Mondays at 00:00.
-
CloudSync to UW Google Drive: Backup occurs in real-time any time new files, or changes to existing files, are detected.
SRA Upload
- Sam will upload all high-throughput sequencing data to the NCBI Sequence Read Archive (SRA). Once submitted, the BioProject accession and a link to the NCBI BioProject will be added to the
SRAcolumn in the Nightingales Google Spreadsheet.
Proteomics Data Management Plan
Raw Data
-
As sequencing facility provides data, files are downloaded to our local NAS (owl), in the root
phainopepladirectory. http://owl.fish.washington.edu/phainopepla/ These data are organized by species, then by mass spectrometer run date (e.g. YYYY-MM-DD). For each run date, allRAWfiles (including blanks, sample, and QC files) should be included in the directory with their original names. Inside of the YYYY-MM-DD directory there should be a Readme file with the following information: Description of each file (eg. treatment, blank, etc), experimental design, link to more information. -
The Spreadsheet is then updated. Each "mass spectrometer run date" will be a new row in the sheet.
Histology Data Management Plan
New to bivalve histology? Start with the tutorial
The Bivalve Histology Tutorial is a self-paced, hands-on walkthrough of reading bivalve tissue sections — orienting to anatomy, identifying tissues and cell types, and recognizing common features in stained slides. Work through it first if histological interpretation is new to you.
1) Before histology cassettes are sent off for processing, fill out the Histology-databank with all relevant information at the sample(tissue) level. Reserve space for blocks and slides by adding block-location and slide-location information. Each sample should have a unique-sample-ID which is:
experiment-date_organism-label_tissue
2) After histology blocks are returned, photograph blocks and slides and label such that the location of each sample(tissue) can be readily understood.
3) Image each sample(tissue). Use the following convention for saving images:
-
`[FULLTIMESTAMP]-[unique-sample-ID]-[magnification].jpeg
-
e.g.
20180924-angasi013-10x.tif
All images should be stored in the proper species directory at http://owl.fish.washington.edu/hesperornis/
Data Archiving
The goal for data archiving is to make your research easily understandable and reproducible in the future. It is therefore incumbent upon the researcher that, by the end of a project, care and effort is given to providing a highly organized and traceable accounting of the research that is archived in perpetuity. At a minimum, this archive should include: raw and full processed data, complete metadata, all computer code, and any research products (manuscripts, published articles, figures, etc.). You will find that creating a usable data archive is much easier to do as you go, rather than waiting until the end of your project!
Options include
- GitHub -> Zenodo.
- Figshare
- UW ResearchWorks
- Open Science Framework
Easy file upload for Collaborators
Finally, data will be most usable if it is as flexible as possible. So an excel spreadsheet with different information on different tabs is not very flexible. Much better to have a text file, with the data in “long form”. This means rather than have a ton of columns, have a ton of rows.
see
Broman KW, Woo KH. (2017) Data organization in spreadsheets. PeerJ Preprints 5:e3183v1 https://www.tandfonline.com/doi/full/10.1080/00031305.2017.1375989